Pages

Sunday, August 31, 2014

Could you toss me a lifeline?

My lovely assistant, Nelea, is helping to display another new (to me) concept: The lifeline.


This is another great idea I learned about at my first meeting of knitters. It works kind of like a Windows Restore Point. You insert a contrasting thread or yarn underneath the stitches you have on the needle at a known good point. In this example, I have one left in there in the row where I stopped increasing and began decreasing stitches. It runs through 53 stitches. Because I lack any confidence whatsoever, I left it in there until I safely inserted the second lifeline at the point where I now have only a nice round 40 stitches left on the needle. Once I had that one sewn in, I removed the old one. It's just running through the work, and it can be removed by simply pulling it from one end.

After the lifeline is inserted, it gets worked into the fabric as you knit the subsequent rows. You don't pick up the lifeline, just the actual yarn you are using in the project. It's pretty neat to watch how it moves around.

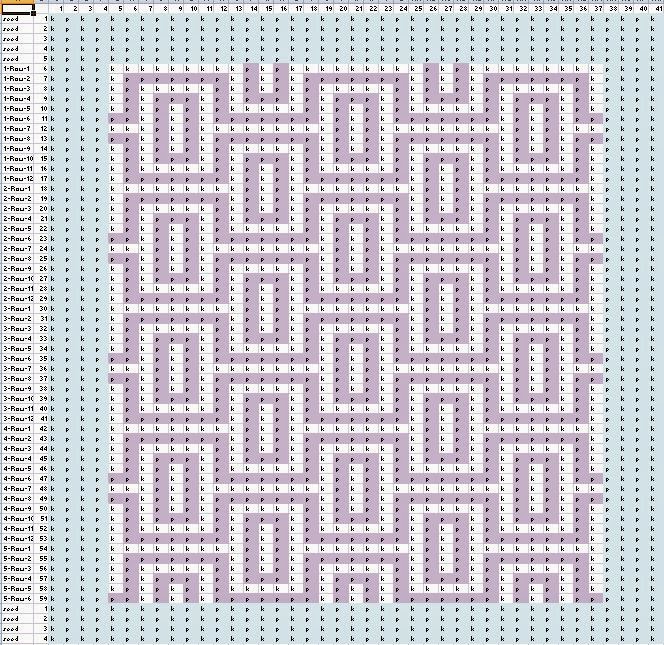
I get so frustrated when I make a mistake I can't fix. I posted a photo of this, my second dish cloth, when I had about 25 rows knitted. I started a different project, and when I went back to this one, I forgot that I was supposed to be adding stitches and just kept knitting away until I had a few more rows. When I realized my mistake, I just ripped everything out and started over. The second go-'round I put lifelines in at points so I would not be required to rip out more than 20 rows, if any. That amount is bearable. Fortunately, 40 rows from completion, I haven't yet needed to resort to using them. On my last project, as I was binding off the final three stitches, the right needle just slipped out of everything and fell on the floor. I was able to work it back in where it belonged, but if I was dealing with a greater number of stitches, or if any had been unraveled into the work, I'd have been screwed.

If I have to resort to this lifeline, all I will need to do is rip out the rows knitted after it was inserted. The thread will stop the unraveling, and I will just need to re-insert the left needle into the loops that have been preserved by the lifeline. Project saved, very few tears, happy knitter.

When I started looking up how the real knitters use this technique, most of the references were to lace-making. Apparently, the pros don't bother with such things on simple projects like the ones I do. I personally believe I will continue to use them in every project from now on.

PRACTICE SAFE KNITTING!


Today's project. I only make square or rectangular things.

Or, as this photo indicates, things that are vaguely square or rectangular.


I visited Urban Arts and Crafts in Briarcliff Village Friday night and picked up a couple of small skeins of lightweight yarn. I even paid for them. I just wanted to check out a store other than the big boxes. They had some beautiful stuff, but way too classy for someone at my level. Baby alpaca and mink? Really?

The store is nice, and the woman at the counter was very helpful. The only problem I had with it is that it reeks of perfume, because they sell soap-making supplies. I doubt I'll be back because of that.

This is cotton, a lighter weight than what I have used up until now. This one had a pattern on the label, so I thought I'd give it a whirl. You knit four rows, and then you do a row of "yarn over, knit two together." Then you knit four more rows, and repeat until you have the desired length. I think a really long piece would make a pretty scarf. As a dish cloth, I think it's a bit too lacy. Maybe a dozen knit rows between the rows with the holes would be more practical.

When you knit two stitches together, that decreases the stitches on your needles by one. BUT, when you do the yarn over by bringing your working yarn from the normal position behind the needle to the front of the needle, it gets caught up in the works and ends up adding back the stitch you just eliminated, but it leaves a big hole. Since the pattern calls for this combination to be repeated for an entire row, you end up with a row full of holes.

I think I'll make a hat for Elsa. The easiest instructions I have seen use circular needles, so I'll be getting some in the near future. Meanwhile, let the dish- and wash- cloths continue!

Thursday, August 28, 2014

Baby steps in knitting

 I have this book that has patterns for making a series of blocks or baby wash cloths and assembling them into this blanket, if desired.


This is the sort of thing I do when I don't understand something. I am in the middle of knitting my second ultra-simple project, a dish cloth, nothing but plain garter stitch. You begin with three stitches, then start adding one stitch each time you knit a row until you have a total of 53 on the needle. Then you start decreasing one each row until you're back down to three and you bind it off. Basically knitting a square across the diagonal. Here's the first one I made, my first knitting project ever.


I made plenty of mistakes. Some I managed to correct, some I didn't.

The second one is going much better so far.


After I finish this one, I want to try to make something pretty. The book says the blanket blocks are easy. We'll see about that.

Here is a photo of the first block from the book:


It has a seed stitched border all around it, and the diamond pattern is knit with a series of knits and purls according to this cryptic set of instructions:


Pardon the green tint. My iPhone does that under fluorescent lights.

So I was having a hard time understanding what's what, especially since it seems to tell you to do the same thing multiple times. At the group meeting Tuesday night, I asked a very nice young lady named Emma to walk me through it, which she did.

Since I wanted to make sure I actually understood what she explained, I decided to make an Excel spreadsheet with each of the stitches on it.


The first instruction is to cast on 41 stitches. Then work five rows of seed stitch. Once you have completed the five rows, each of the following rows is to begin and end with 4 seed stitches. They are all in blue.

Once in the pattern area, the instructions say to do a certain number of knits and purls in each row. For instance, the instruction for 1-Row-1 (The first row of a set of 12 rows that is later repeated 3 1/2 times) reads as follows: *k9, p1, k1, p1; rep from * once, k9. So I typed in the Ks and Ps for the first set highlighted in light pink, and then I copied the second set and made it darker pink. The standalone k9 at the end is not highlighted.

I continued following the instructions for Rows 2-12 in the same way, alternating between pink and green. Then I copied all 12 rows into 2-Row-1 through 4-Row12. Then I copied the first six rows into 5-Row-1 through 5-Row-6. Finally, I added another four rows of seed stitch at the end per the instructions.

To make sure I had done it right, I made another copy of the worksheet and added conditional formatting in the pattern area to highlight only the purls. This is the result:


Whaaa??? Them ain't diamonds. Them are squares. What have I done?

Each time you finish a row, you knit the next one from the other side of the fabric. You are alternating between the right and wrong sides. So the first row of the pattern is on the wrong side (since it is the sixth row of the whole project, and your first row of seed stitch was on the right side.) Therefore, the second row of the pattern is on the right side.

A knit stitch on the right side is a purl stitch on the wrong side, and vice versa. So I made another worksheet copy and selected the odd-numbered rows and used find-and-replace to turn all the Ks into Ps and all the Ps into Ks.  This is what happened:


Dun-da-da-dah!!! I do understand it! I'm going to actually knit it over the long weekend and see if I can get it done without mistakes using some cheap acrylic yarn. Now that I have a blog, I'll bore you with the details here instead of on Facebook. Good evening, everyone.