Hey, folks. I didn't much care for the off-white one. It needs more substantial yarn. I found this Tahki Montana on sale at Yarn Shop and More, and I picked it up off a clearance shelf for $10.00.
It's heavier than the other yarn I had used, but it could stand some more thickness. The yarn from the designer is three times heavier. It's also $30.00 plus shipping, so I'm happy with this one for now.
G'night!
Thursday, February 18, 2016
Wednesday, February 3, 2016
Some hats for moi
I wanted to get a couple of hats ready to wear for the remainder of the winter. I'd really like to become a hat lady, but my workplace won't allow anything that looks like it might be a stocking cap to be worn inside.
So, here they are:
This cloche is from another free Ravelry pattern, The Lady Lorri Hat by Madelena Cascio, http://www.ravelry.com/patterns/library/lady-lorri-hat-2 It is also a super bulky yarn, and I made it in cream for my mother-in-law and in black for myself. The yarn I used was Bernat Blanket.
The black cowl doesn't show up well in the picture. It's the Wham Bam Thank You Lamb! from Susan Chang. http://www.ravelry.com/projects/hbananas/wham-bam-thank-you-lamb-neckwarmer. It is knit as a band about 12-14" wide, measured to fit the wearer's neck, then seamed into a circle, but instead of making the ends flush, they are offset a few inches on each side. Here's her picture from the pattern.
So, here they are:
This turban is made from a free pattern available on Ravelry from The Third Piece company called The Soho - Turban Hat http://www.ravelry.com/patterns/library/the-soho---turban-hat. The recommended yarn is their Funky Chunky, a super bulky yarn http://the3rdpiece.com/. It's $30 for about 70 yards. I used a different yarn, also a super bulky, named Mirasol Ushya that I bought at Florilegium in Weston. It's mostly merino, with some nylon added. It's not as bulky as the Funky Chunky, but the price was reasonable, and I wasn't sure if I could make it. Now that I am, I will probably buy some Funky Chunky, or maybe some Cascade Yarns Magnum for the next one. I could also adjust the width of the turban band for other yarn weights, now that I understand the construction. I credit this lady, who made the hat and described it on her blog: http://ggmadeit.com/blog/the-tale-of-the-turban/
This cloche is from another free Ravelry pattern, The Lady Lorri Hat by Madelena Cascio, http://www.ravelry.com/patterns/library/lady-lorri-hat-2 It is also a super bulky yarn, and I made it in cream for my mother-in-law and in black for myself. The yarn I used was Bernat Blanket.
The black cowl doesn't show up well in the picture. It's the Wham Bam Thank You Lamb! from Susan Chang. http://www.ravelry.com/projects/hbananas/wham-bam-thank-you-lamb-neckwarmer. It is knit as a band about 12-14" wide, measured to fit the wearer's neck, then seamed into a circle, but instead of making the ends flush, they are offset a few inches on each side. Here's her picture from the pattern.
Mine's a little snug, and it tends to push the back of the hat forward onto my head. I will try wearing it backwards, with the skinny part under the hat. I have enough of the black blanket yarn to try a different cowl, too.
I also made myself a rolled brim ordinary stocking cap using Patons Classic Wool Bulky, using the same pattern as for Kasia's and Elsa's hats. It's just plain brown and not worth a picture. It's a tiny bit short, too, so I'm not sharing. My blog, my choice! Stay warm out there, folks.
Holly Nan
Sunday, December 13, 2015
Prayer Shawls, Pocket Cloths, and Experiments
When I took up knitting last year, I started looking for a way to do it socially and charitably. The Lion Brand website maintains a list, and it turned out that there is a prayer shawl group that meets the second Saturday of each month at Living Water Christian Church (Disciples of Christ) in Parkville. I joined the group in December 2014. The pastor, Laura Guy, is a member of the group, and I really like her, so I started attending the church. That was another thing that had been missing from my life.
Lion's website address is www.lionbrand.com
Here is the church's website address www.livingwaterchristian.org
Lion has a lot of free prayer shawl patterns on their site, and I've used the basic pattern twice. Buy three skeins of Homespun, cast on 63 stitches, and in every row knit 3, purl 3, to the end, until you run out of yarn. You end up with something like seed stitch, only with fewer changes between knitting and purling. The threes are to give a nod to the holy trinity. This is the first one I made. You may have to create a free Lion Brand account to view the actual pattern. http://www.lionbrand.com/patterns/81040AD.html?noImages=0
I have also made one using the Cashews pattern from Alice's Embrace, an organization that donates to Alzheimer's patients. http://www.alicesembrace.com/patterns/#/cashews/
This summer, one of the group's members attended the big meeting of the Disciples church and came back with the suggestion we make pocket cloths or shawls in addition to the larger ones. They're portable, they're a ton faster to make, and they can use up small amounts of yarn that are left over from other things. We've been making them with nice soft blanket yarn and jokingly referring to them as "woobies" because they exist for comfort and are fun to feel.
I used patterns from a combination of the following sources:
http://www.oslclaurel.org/ministry/prayer_shawl/prayer_cloths_cross.pdf and
http://holston.org/media/about/resource/2015-pocketprayershawlinfo.pdf
Here are pictures of ones I made using these patterns.
This is a washcloth pattern from Ravelry. I tried making it smaller by knitting it with finer yarn and smaller needles, but it's still a little too large for a pocket cloth in my opinion. I'd feel funny washing dishes with it, too. http://www.ravelry.com/patterns/library/3-crosses-cloth
This is another washcloth pattern available on Ravelry. I used an ombre yarn with blues and greens to make it, since we are Living Water. http://www.ravelry.com/patterns/library/wave-pool-cloth
The fish pattern above looks more like a shield to me. Instead, I experimented with the traditional Christian fish symbol and made up my own chart. Here's mine. I doubled the yarn when I did the duplicate stitch of the cross, and next time I will just use a single strand. I shared it on Ravelry as a free pattern. http://www.ravelry.com/patterns/library/christian-fish-prayer-cloth
Same story with the dove. It looked more like an arrow to me, so I am experimenting with one modeled after the Dove Soap logo. This is scrap yarn and a too-large leaf I had lying around. My hope is that smaller needles and thinner yarn will make it a reasonable size. I'll make an update post once I have it finalized, a decent picture taken, and a published pattern address to share.
Lion's website address is www.lionbrand.com
Here is the church's website address www.livingwaterchristian.org
Lion has a lot of free prayer shawl patterns on their site, and I've used the basic pattern twice. Buy three skeins of Homespun, cast on 63 stitches, and in every row knit 3, purl 3, to the end, until you run out of yarn. You end up with something like seed stitch, only with fewer changes between knitting and purling. The threes are to give a nod to the holy trinity. This is the first one I made. You may have to create a free Lion Brand account to view the actual pattern. http://www.lionbrand.com/patterns/81040AD.html?noImages=0
I have also made one using the Cashews pattern from Alice's Embrace, an organization that donates to Alzheimer's patients. http://www.alicesembrace.com/patterns/#/cashews/
This summer, one of the group's members attended the big meeting of the Disciples church and came back with the suggestion we make pocket cloths or shawls in addition to the larger ones. They're portable, they're a ton faster to make, and they can use up small amounts of yarn that are left over from other things. We've been making them with nice soft blanket yarn and jokingly referring to them as "woobies" because they exist for comfort and are fun to feel.
I used patterns from a combination of the following sources:
http://www.oslclaurel.org/ministry/prayer_shawl/prayer_cloths_cross.pdf and
http://holston.org/media/about/resource/2015-pocketprayershawlinfo.pdf
Here are pictures of ones I made using these patterns.
Cross
Fish Cloth per the patterns
The next three pictures should be rotated 90 degrees counterclockwise. Until I get that fixed, please tilt your head to the right when viewing them.
Descending Dove
Angel
Awareness Ribbon (in this case, Leukemia color.)
Customized two-color cross in University of Missouri colors for a friend to give to her son.
This is another washcloth pattern available on Ravelry. I used an ombre yarn with blues and greens to make it, since we are Living Water. http://www.ravelry.com/patterns/library/wave-pool-cloth
The fish pattern above looks more like a shield to me. Instead, I experimented with the traditional Christian fish symbol and made up my own chart. Here's mine. I doubled the yarn when I did the duplicate stitch of the cross, and next time I will just use a single strand. I shared it on Ravelry as a free pattern. http://www.ravelry.com/patterns/library/christian-fish-prayer-cloth
My Christian Fish
Same story with the dove. It looked more like an arrow to me, so I am experimenting with one modeled after the Dove Soap logo. This is scrap yarn and a too-large leaf I had lying around. My hope is that smaller needles and thinner yarn will make it a reasonable size. I'll make an update post once I have it finalized, a decent picture taken, and a published pattern address to share.
Saturday, December 12, 2015
Basic Bulky Beanies and Cowls
On my post-Thanksgiving, Small Business Saturday visit to Stitch Space in Webb City, MO, I went in with the intention of buying something to help support Sasha's lovely yarn shop. I bought several things, but this is the first completed project from the haul.
I previously made scarves for both the daughter-in-law and the granddaughter with a total of three skeins of Plymouth Baby Alpaca Grande Hand Painted yarn. The pattern was Stephanie Pearl McPhee's One Row Scarf.While I was at the yarn store, I called my sweet d-i-l and asked if they'd like hats to go with their scarves. I was given permission to knit some up, so I bought another three skeins of what I thought was the same colorway of the yarn. Here is a scarf.
Now, let's look at the hat:

Yeah. Way off. I wanted them to have sets, so I used the leftovers to make each of them a cowl.

Fortunately, I purchased too much of this new yarn, so I made a simple, snug cowl for each of them from the remainder. I just cast on the same number of stitches I had used in each hat, did a 2x2 rib for 8 rounds and a body of stockinette, followed by another 8 rounds of 2x2.
I made each of the hats starting with a fresh skein, and each had leftovers. I was able to make a toddler cowl using the above recipe with them, and then I used the entire extra (3rd) skein for the adult cowl.
Trust me. I really, really did use the same yarn for both the hat and the cowl shown here. The hat is in my crazy bright bathroom, and the cowl is on the bed, with Nelea supervising.
Saturday, November 7, 2015
The Egg Salad Blanket
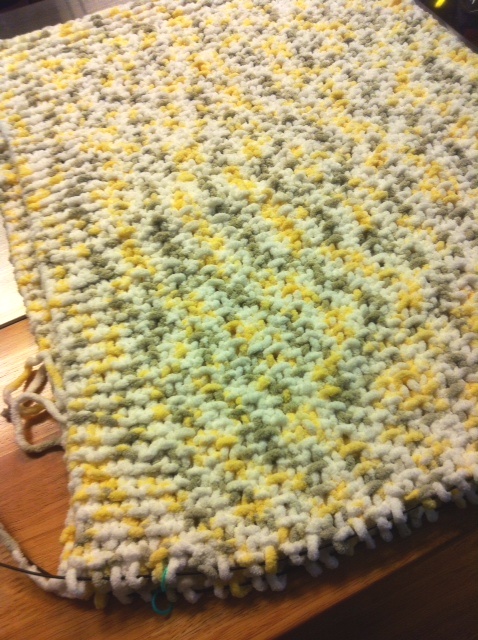
I saw some super-cute Bernat Baby Blanket yarn at Jo-Ann around Easter. The colorway I was interested in is Chicks and Bunnies. It's basically white with yellow (chicks) and gray (bunnies) scattered around. I have never seen this colorway anywhere else, and I only saw it at Jo-Ann that one time.
When I was working on it at a knitting group, I mentioned that I thought the seed stitch sections looked like chopped hard-boiled eggs that had been overcooked and had that little gray ring around the yolk. They christened it the Egg Salad Blanket.
This is an easy blanket, knit using only garter and seed stitches. I made mine with three 300 gram balls of the yarn. I used US 13, 9mm needles. My blanket has holes, so if I was starting it over again today, I would use size 11 or even 10.5 needles for a tighter fabric. I sewed a tag made of satin blanket binding into the blanket, because my granddaughter loves to feel the tags while she sucks her thumb.
Please forgive the green-tinged spot. My camera does that under fluorescents.
I have made the pattern available on Ravelry, named Egg Salad Blanket, if anyone is interested in having it. Free Ravelry Download Egg Salad Blanket Pattern
This is what the .pdf file says, if you don't want to download the .pdf from there.
THE PATTERN:
1. Weigh your first ball of yarn, which should be close to 300 grams, and make a note of the actual weight.
2. Cast on 75 stitches on a circular needle that can accommodate a piece of this width. You will not be joining in the round.
3. Knit each row for 10 rows. (Garter stitch).
4. After completing the 10th row, weigh your ball of yarn again and subtract the result from the beginning weight. This will tell you how much yarn you will need when you are ready to finish the piece, with another 10 rows of garter stitch.
5. Set up row: k5, place marker, k1, p1, continuing for 65 stitches (to the last 5), place marker, k5. This will set you up to create a garter stitch border along the sides with the center being seed stitch over an odd number of stitches, enabling you to begin and end each row of the center section with a knit stitch.
6. Continue in pattern, the same for every row: k5, slip marker, k1, p1 for 65 stitches, slip marker, k5.
7. Attach the second and third balls of yarn when required.
8. As you near the end of your project, weigh the remainder of the last ball of yarn, reserving at least the same amount you used to cast on and knit your first 10 rows of garter stitch.
9. When you have used all but the amount you have reserved, knit 10 rows of garter stitch and bind off loosely. An easy loose bind-off is Grandma’s Favorite, which can be found on YouTube. Weave in the ends.
10. You can wash the blanket in cool or warm water and machine dry it on low heat.
Sunday, October 25, 2015
How I propelled the Royals to the World Series through knitting and crochet AND HELPED THEM WIN
#ForeverRoyal #TakeTheCrown
I wear a lot of black and white clothing to work, since it's easy to mix and match. I have been wanting to add some jewel-toned scarves to the wardrobe to keep things interesting.
One of my favorite colors is blue. My husband is a Royals fanatic, and when baseball season began, I wanted to wear blue on game days to be supportive.
I went shopping at Jo-Ann for suitable yarn. I don't like acrylic because it makes me itch and gives me dry eyes and throat. The only non-acrylic royal blue yarn they had there were Deborah Norville Serenity Active and Patons Classic Wool Bulky. The Deborah Norville yarn is 70% polyester and 30% acrylic, so I settled for it and bought a couple of balls because it was cheap and machine washable. It's supposed to have wicking properties making it suitable for athletic wear.
.
The first one I made was a single strand of this knit on US 50 35mm needles. This item did not survive. I started out by joining it into an infinity scarf, then decided I wanted it to be flat. In the process of unseaming, it began to unravel, so I ended up trashing it. The huge needles made a nice, airy fabric, and I intend to use this technique again.
I wanted something to wear right away so I grabbed a huge crochet hook and made this one in the round. I think it is a foundation chain of singles, a couple of rows of doubles, and it ends with either singles or slip stitches. I really don't remember. I didn't make it an even cylinder. After the first row of double crochets I stair-stepped it so that the back would stay short. It is really longer than in this picture, but the last time I wore it, I wanted it to be shorter, so it has a couple of little alligator hair clips folding the back on itself.
With the yarn I had left, I decided to make a keyhole scarf. I believe this is 24 stitches on size US 13 needles. I knitted it in linen stitch until it was the desired length. Then I wanted to try a keyhole technique I've seen in some patterns that involves knitting a stitch, placing the next on a holder, knitting the next, holding the next, until you're knitting half of the stitches and leaving the others on the holder.
I did 10 rows of garter stitch with the stitches that were on the needles. I should have stuck with linen stitch, but I didn't know how to get it going correctly when I was only knitting every other stitch to begin with. I cut the yarn and swapped the stitches on the needle for the ones on the holder.
I likewise knit 10 rows of garter stitch and returned the first tab piece to the needles. Then I knit in linen stitch until the part past the keyhole was the length I wanted. I didn't know how this would turn out when I started. You end up with an upper and lower layer, each shifted from the center. When you stick the scarf through the hole, the shift isn't outstanding.
I did 10 rows of garter stitch with the stitches that were on the needles. I should have stuck with linen stitch, but I didn't know how to get it going correctly when I was only knitting every other stitch to begin with. I cut the yarn and swapped the stitches on the needle for the ones on the holder.
I likewise knit 10 rows of garter stitch and returned the first tab piece to the needles. Then I knit in linen stitch until the part past the keyhole was the length I wanted. I didn't know how this would turn out when I started. You end up with an upper and lower layer, each shifted from the center. When you stick the scarf through the hole, the shift isn't outstanding.
My system worked so well that the Royals became the Central Division American League champions. I needed more blue stuff.
I have admired patterns like the one below for some time, and I wanted to make something with cables, since I hadn't done that before. I bought two balls of the Patons Classic Wool Chunky in Royal(s) Blue. The twists are nice and tight, perfect for patterns that require good stitch definition. This is also the first time I have knitted with wool, and I loved it. It's nice and springy.
This pattern is called Sulka Scarflette, free on Ravelry. http://www.ravelry.com/patterns/library/sulka-scarflette
I used their search filters to find one that uses bulky yarn and small yardage. This pattern has 16 cables on it. The first ball lasted through the 15th one. This is how it looked after knitting, before blocking. It only took a few hours.
After it was nice and dry and rectangular, I bought buttons for it. The pattern calls for 1" buttons and has buttonholes knit in. I couldn't find 1", only 1-1/8" buttons. They didn't really want to go through the keyholes without forcing, and I didn't want to hurt the scarf. I just sewed the buttons in place as if they had been buttoned already. When I wash it the first time, I will probably have to remove the buttons and block it flat again before reattaching them. It will always require hand washing and gentle treatment, to prevent felting.
I have admired patterns like the one below for some time, and I wanted to make something with cables, since I hadn't done that before. I bought two balls of the Patons Classic Wool Chunky in Royal(s) Blue. The twists are nice and tight, perfect for patterns that require good stitch definition. This is also the first time I have knitted with wool, and I loved it. It's nice and springy.
This pattern is called Sulka Scarflette, free on Ravelry. http://www.ravelry.com/patterns/library/sulka-scarflette
I used their search filters to find one that uses bulky yarn and small yardage. This pattern has 16 cables on it. The first ball lasted through the 15th one. This is how it looked after knitting, before blocking. It only took a few hours.
After it was nice and dry and rectangular, I bought buttons for it. The pattern calls for 1" buttons and has buttonholes knit in. I couldn't find 1", only 1-1/8" buttons. They didn't really want to go through the keyholes without forcing, and I didn't want to hurt the scarf. I just sewed the buttons in place as if they had been buttoned already. When I wash it the first time, I will probably have to remove the buttons and block it flat again before reattaching them. It will always require hand washing and gentle treatment, to prevent felting.
I had most of the second ball left, and there was another pattern on Ravelry that looked like fun. It's the Angela Twist.
http://www.ravelry.com/patterns/library/angela-twist
You cast 7 stitches of super bulky yarn onto a US 15 double-pointed needle and knit a big fat i-cord. I used 13s, since my yarn was plain bulky. I don't have large DPNs, but all of my needles are circular, so you can just treat them like DPNs in this instance.
You knit to the desired length, about 42" in this case, form a circle in your hands with half of the length, and loop the remainder through the circle many times. then you sew the ends together and arrange your loops.
When completed, it was fat and fluffy and not quite as long as I wanted. I blocked it to transfer some of the thickness into length, and this is how it turned out. I made a little stockinette tab to wrap around the seam and hide it.
So now I am well equipped to make it through the Series! I've always knitted while Kent was watching the games, but now I am actually able to follow the action and have become a fan myself.
GO ROYALS! #TakeTheCrown
Sunday, October 18, 2015
Crocheting with plarn
My first project crocheted from plarn. Because there isn't enough yarn in this house. This shade of plarn is Hy-Vee. I keep my unscented hand soap, sanitizer, and lotion in it for a quick grab when heading to the restroom. My hands break out from the scented stuff provided by the building.
In case you haven't guessed, plarn stands for plastic yarn. It is made by cutting the handles and bottoms off grocery store bags, cutting the remaining tube part into loops, and chaining the loops together. Most patterns I've seen recommend holding two strands of plarn together, because it's pretty weak in singles.
I used crochet because it seemed the quickest way to go. There's no pattern, just made a rectangular bottom, and then crocheted around it until I had the height I needed. The handles were made by skipping about 15 crochets in the middle of each side and instead chaining those stitches before resuming after the end. I went around one more time to give the handles a little thickness.
I have a lot of bags saved up, but I haven't plarned again yet. When I do, I'll have some nice Target ones that are purely white and red and some Hy-Vee ones that are black, blue, and gold for the Royals baseball season. Also some gray Wal-Mart ones.
In case you haven't guessed, plarn stands for plastic yarn. It is made by cutting the handles and bottoms off grocery store bags, cutting the remaining tube part into loops, and chaining the loops together. Most patterns I've seen recommend holding two strands of plarn together, because it's pretty weak in singles.
I used crochet because it seemed the quickest way to go. There's no pattern, just made a rectangular bottom, and then crocheted around it until I had the height I needed. The handles were made by skipping about 15 crochets in the middle of each side and instead chaining those stitches before resuming after the end. I went around one more time to give the handles a little thickness.
I have a lot of bags saved up, but I haven't plarned again yet. When I do, I'll have some nice Target ones that are purely white and red and some Hy-Vee ones that are black, blue, and gold for the Royals baseball season. Also some gray Wal-Mart ones.
Subscribe to:
Posts (Atom)